[사전 작업]
Java JDK
Appium is installed
Android sdk is setup (for testing on android )
Xcode is setup (for testing on iOS)
Mobile device is ready for automation
Eclipse is installed
Appium 설치 관련
https://dejavuqa.tistory.com/222
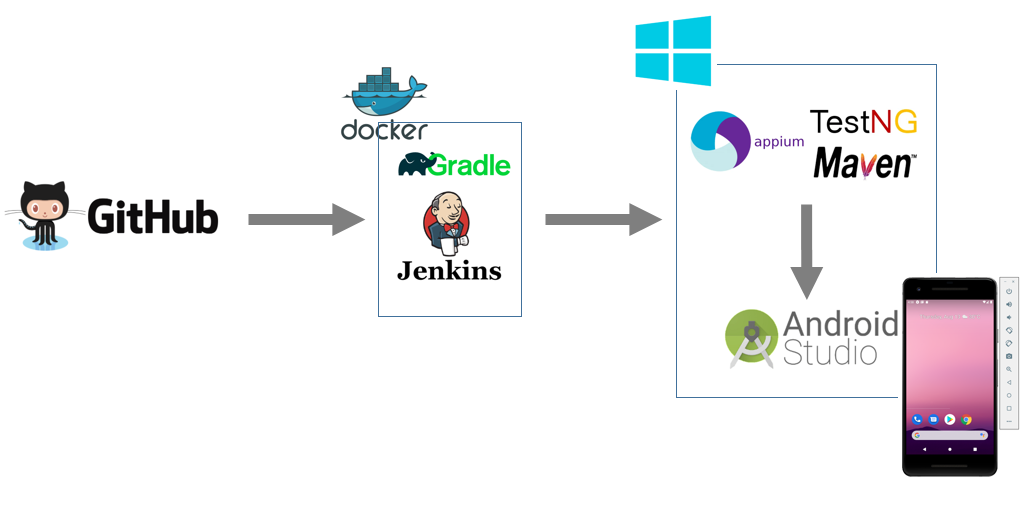
Appium 서버 구성 (on Windows)
app 자동화 테스트를 위해 Windows에 Appium을 설치해 보겠습니다. 먼저 Java JDK를 설치해야 합니다. PC에 Java가 설치되어 있다면 넘어가셔도 됩니다. 아래 Oracle에 가서 JDK 8 Windows 버전을 다운로드 합니
dejavuqa.tistory.com
[관련환경 변수]
ANDROID_HOME=C:\Users\toast\AppData\Local\Android\Sdk
CLASSPATH=C:\Program Files\Java\jdk1.8.0_261\lib;.;
JAVA_HOME=C:\Program Files\Java\jdk1.8.0_261
MAVEN=C:\apache-maven-3.6.3-bin\apache-maven-3.6.3
MAVEN_HOME=C:\apache-maven-3.6.3-bin\apache-maven-3.6.3
Path=C:\apache-maven-3.6.3-bin\apache-maven-3.6.3\bin;C:\Program Files\Java\jdk1.8.0_261\bin;C:\Users\toast\AppData\Local\Android\Sdk;C:\Program Files (x86)\Common Files\Oracle\Java\javapath;C:\Users\toast\AppData\Local\Android\Sdk\platform-tools;F:\Tools\gradle-6.5.1-bin\bin
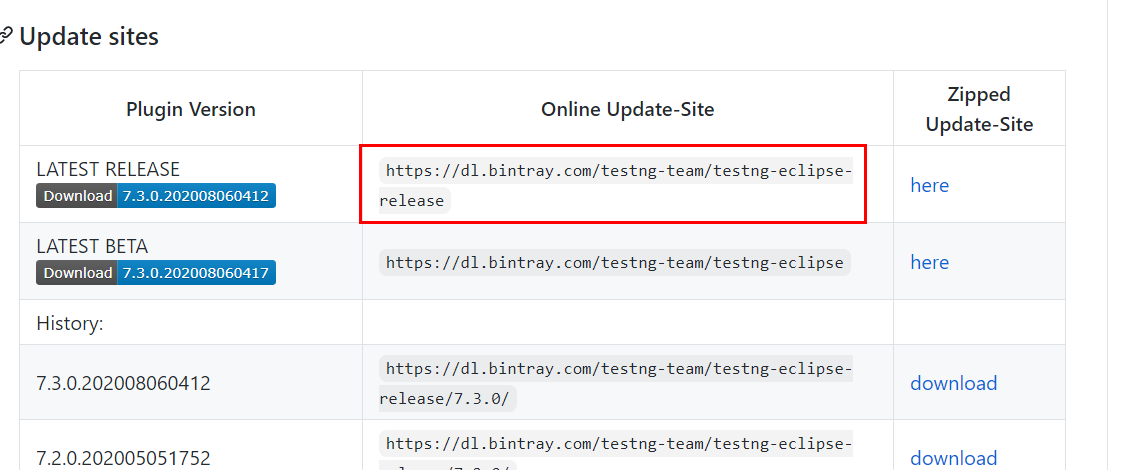
Install TestNG in Eclipse
아래 URL 들어가서 "Online Update-Site" 복사
https://github.com/cbeust/testng-eclipse/
cbeust/testng-eclipse
Eclipse plug-in for TestNG. Contribute to cbeust/testng-eclipse development by creating an account on GitHub.
github.com
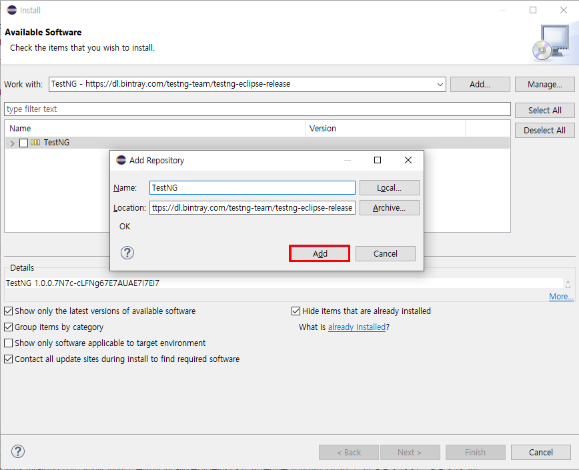
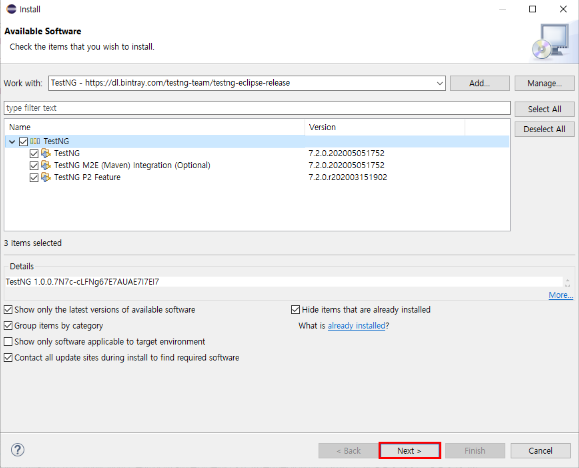
[이클립스]
Help > Install New Software > Add.. 클릭 후 아래와 같이 작성
Create a new maven project
Add required lib/dependencies
maven을 이용한 아래의 라이브러리를 불러오기
Appium java client
Selenium java
TestNG
[pom.xml]
<project xmlns="http://maven.apache.org/POM/4.0.0" xmlns:xsi="http://www.w3.org/2001/XMLSchema-instance" xsi:schemaLocation="http://maven.apache.org/POM/4.0.0 https://maven.apache.org/xsd/maven-4.0.0.xsd">
  <modelVersion>4.0.0</modelVersion>
  <groupId>com.appium.Demo</groupId>
  <artifactId>AppiumDemoProject</artifactId>
  <version>0.0.1-SNAPSHOT</version>
  <name>POMframework</name>
  <url>http://maven.apache.org</url>

   <properties>
                        <project.build.sourceEncoding>UTF-8</project.build.sourceEncoding>
   </properties>

            <repositories>
                        <repository>
                                    <id>spring-releases</id>
                                    <name>Spring Releases</name>
                                    <url>https://repo.spring.io/libs-release</url>
                        </repository>
            </repositories>
            <pluginRepositories>
                        <pluginRepository>
                                    <id>spring-releases</id>
                                    <name>Spring Releases</name>
                                    <url>https://repo.spring.io/libs-release</url>
                        </pluginRepository>
            </pluginRepositories>


<dependencies>

	<!-- https://mvnrepository.com/artifact/org.seleniumhq.selenium/selenium-java -->
	<dependency>
	    <groupId>org.seleniumhq.selenium</groupId>
	    <artifactId>selenium-java</artifactId>
	    <version>3.141.59</version>
	</dependency>

	<!-- https://mvnrepository.com/artifact/io.appium/java-client -->
	<dependency>
	    <groupId>io.appium</groupId>
	    <artifactId>java-client</artifactId>
	    <version>7.3.0</version>
	</dependency>

	<!-- https://mvnrepository.com/artifact/org.testng/testng -->
	<dependency>
	    <groupId>org.testng</groupId>
	    <artifactId>testng</artifactId>
	    <version>7.1.0</version>
	    <scope>compile</scope>
	</dependency>

</dependencies>

<build>
                        <plugins>
                                    <!-- Compiler plug-in -->
                                    <plugin>
                                                <groupId>org.apache.maven.plugins</groupId>
                                                <artifactId>maven-compiler-plugin</artifactId>
                                                <version>3.8.1</version>
                                                <configuration>
                                                            <source>1.8</source>
                                                            <target>1.8</target>
                                                </configuration>
                                    </plugin>

                                    <!-- Below plug-in is used to execute tests -->
                                    <plugin>
                                                <groupId>org.apache.maven.plugins</groupId>
                                                <artifactId>maven-surefire-plugin</artifactId>
                                                <version>2.18.1</version>
                                                <configuration>
                                                            <suiteXmlFiles>
                                                                        <!-- TestNG suite XML files -->
                                                                        <suiteXmlFile>testng.xml</suiteXmlFile>
                                                            </suiteXmlFiles>
                                                </configuration>
                                    </plugin>
                        </plugins>
 </build>

</project>
위의 내용은 아래 그림과 같이 mavenrepository에서 참고하여 복붙함
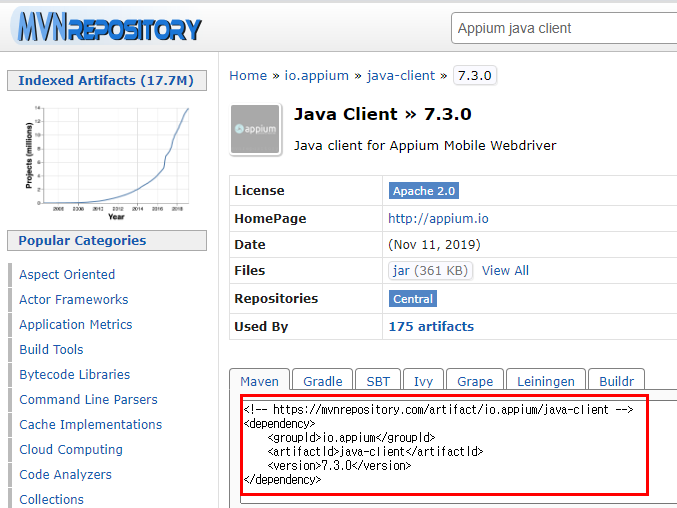 https://mvnrepository.com/ 에서 해당 library 검색
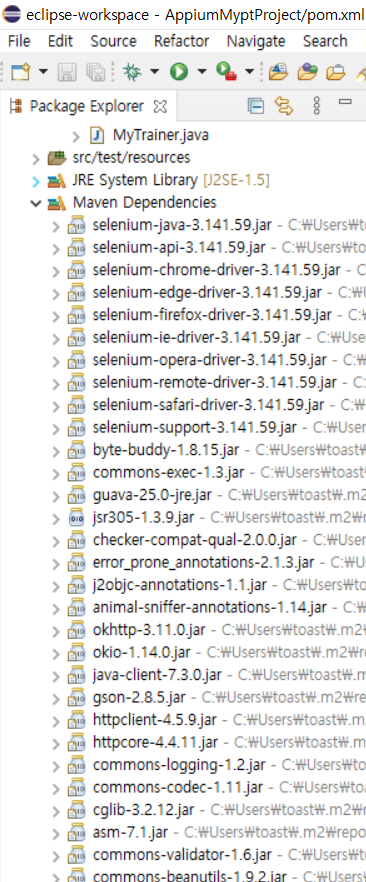
Save - Clean - Build project
자동으로 Maven이 해당 dependency를 참고하여 자동으로 관련 라이브러리가 추가된다
Create tests folders under src/main/java
User src/test/resources create a folder
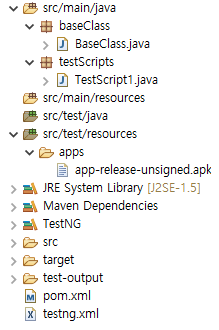
Inside tests folder create a class - BaseClass
[BaseClass.java]
package baseClass;

import java.io.File;
import java.net.URL;
import java.util.concurrent.TimeUnit;

import org.openqa.selenium.remote.DesiredCapabilities;
import org.testng.annotations.AfterTest;
import org.testng.annotations.BeforeTest;
import org.testng.annotations.Test;

import io.appium.java_client.AppiumDriver;
import io.appium.java_client.MobileElement;

public class BaseClass {

    protected AppiumDriver<MobileElement> driver;

    @BeforeTest
    public void setup()  {

        try {

      	File classpathRoot = new File(System.getProperty("user.dir"));
    	File appDir = new File(classpathRoot, "\\src\\test\\resources\\apps");
		File app = new File(appDir, "app-release-unsigned.apk");

        DesiredCapabilities cap = new DesiredCapabilities();
        cap.setCapability("deviceName", "sdk_gphone_x86");  //Phone model number
        cap.setCapability("udid", "emulator-5554");
        cap.setCapability("platformName", "Android");
        cap.setCapability("platformVersion", "11");
        cap.setCapability("app", app.getAbsolutePath());
        cap.setCapability("appPackage", "corp.doha.mypt");
        cap.setCapability("appActivity", "corp.doha.mypt.activity.StartActivity");

        URL url = new URL("http://localhost:4723/wd/hub");

        driver = new AppiumDriver<MobileElement>(url, cap);
        driver.manage().timeouts().implicitlyWait(15, TimeUnit.SECONDS);
        driver.hideKeyboard();
        Thread.sleep(5000);

        } catch(Exception exp) {
            System.out.println("Cause is : "+exp.getCause());
            System.out.println("Cause is : "+exp.getMessage());
            exp.printStackTrace();
        }

    }

  @Test
  public void sampleTest() {
      System.out.println("I am inside sample Test");
  }

  @AfterTest
  public void teardown() {
      driver.closeApp();
      driver.quit();
    }

}
adb devices는 android studio를 이용해서 에뮬로 돌렸음
Desired Capabilities 관련 정보 얻는 방법은 아래 URL 참고
https://medium.com/@ivantay2003/appium-desired-capabilities-basic-cheat-sheet-to-launch-mobile-application-ios-android-75b664367031
Appium Desired Capabilities — Basic Cheat Sheet to Launch Mobile Application (iOS / Android)
Article is published and is updated as of 1st October 2019. This information may be outdated by the time you read it.
medium.com
Add test class and extend BaseClass
[TestScript1.java]
package testScripts;

import org.openqa.selenium.By;
import org.testng.annotations.Test;

import baseClass.BaseClass;
import io.appium.java_client.MobileElement;

public class TestScript1  extends BaseClass{

	@Test
	public void Login() throws InterruptedException{

//		MobileElement Inputid = driver.findElement(By.id("corp.doha.mypt:id/input_id"));
//		Inputid.sendKeys("test");
//		MobileElement Inputpw = driver.findElement(By.id("corp.doha.mypt:id/input_password"));
//		Inputpw.sendKeys("test");
		MobileElement Login = driver.findElement(By.id("corp.doha.mypt:id/button_login"));
		Login.click();
		System.out.println("Completed Test Login...");
		Thread.sleep(5000);

	}

}
위의 스크립트는 아래 API 문서 참고
http://appium.io/docs/en/about-appium/api/#appium-api-documentation
API Documentation - Appium
From here you can search these documents. Enter your search terms below.
appium.io
Run & Test
1. Run Appium Server
2. Run TestScript1.java
[참고]
1. appium server 관련
아래와 같은 오류 대응은 아래 URL 참고하자
An unknown server-side error occurred while processing the command.
Original error: unknown error: Chrome version must be >= 55.0.2883.0
http://appium.io/docs/en/writing-running-appium/web/chromedriver/
Using Chromedriver - Appium
From here you can search these documents. Enter your search terms below.
appium.io