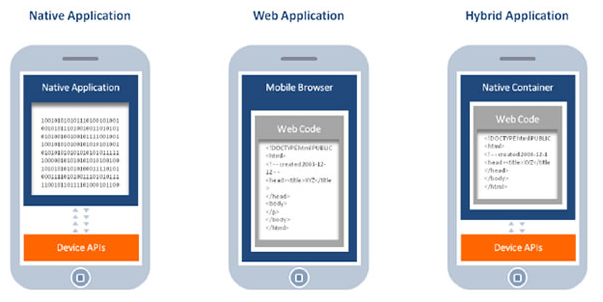
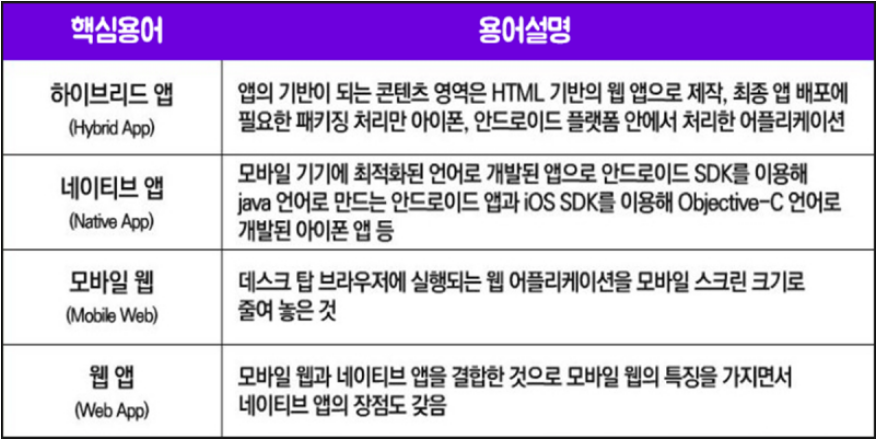
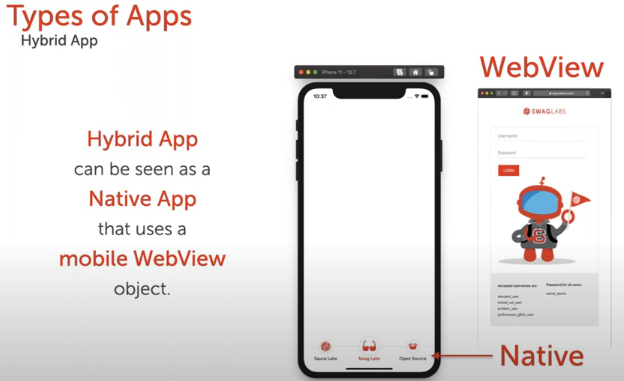
Hybrid Application

  • 네이티브 앱 형태로 만들되 그 안에서 웹사이트를 띄울 수 있는 브라우저 창을 두는 앱
  • 장점
    • 네이티브 수준의 구현을 업데이트 할 때만 마켓 검수가 필요하고 웹뷰에서 나타나는 컨테츠는 웹 사이트만 수정하기 되기 때문에 훨씬 더 유연하게 개발가 유지보수가 가능함 


사전 준비

  • 사전에 크롬드라이버가 설치 되어있어야 한다.


웹뷰 모드로 접근

  • 크롬 드라이버 로드 및 웹뷰 모드 on
desired_caps['chromedriverExecutable'] = 'D:\Test_Appium\chromedriver.exe'
desired_caps['autoWebview'] = True
 
  • 자동화 컨텍스트 설정
webview = driver.contexts[1]
driver.switch_to.context(webview)


만약 Native 메뉴로 접근해야한다면?

  • 해당 메뉴에 접근 할때는 아래와 같이 스위칭을 해줘야 한다.
driver.switch_to.context('NATIVE_APP')
 
  • 다시 웹뷰로 접근할때는 아래와 선언해줍니다.
driver.switch_to.context(webview)
 

예제 소스

'''
Test App
Device: emulator-5554
'''
import unittest
from appium import webdriver
from time import sleep
import os
from selenium.webdriver.support.ui import WebDriverWait
from selenium.webdriver.common.by import By
from selenium.webdriver.support import expected_conditions as EC
from selenium.common.exceptions import NoSuchElementException
from appium.webdriver.common.touch_action import TouchAction
 
class LoginTest(unittest.TestCase):
 
    def setUp(self):    
        desired_caps = {}
        desired_caps['platformName'] = 'ANDROID'
        desired_caps['platformVersion'] = '12'
        desired_caps['deviceName'] = 'device1'
        desired_caps['udid'] = 'emulator-5554'
        desired_caps['automationName'] = 'Appium'        
        desired_caps['chromedriverExecutable'] = 'D:\Test_Appium\chromedriver.exe'
        desired_caps['appPackage'] = 'com.xxx.xxxx'
        desired_caps['appActivity'] = 'com.xxx.xxxx'
        desired_caps['unicodeKeyboard'] = True
        desired_caps['resetKeyboard'] = True
        desired_caps['autoWebview'] = True
        desired_caps['noReset'] = True
 
 
        self.driver = webdriver.Remote('http://127.0.0.1:4723/wd/hub', desired_caps)
 
    def testRun(self):      
 
        driver = self.driver       
        wait = WebDriverWait(driver, 20)
        # switch to webview
        webview = driver.contexts[1]
        driver.switch_to.context(webview)
        mainloginbtn = wait.until(EC.element_to_be_clickable((By.CSS_SELECTOR, '#topArea > nav > ul > li.xans-element-.xans-layout.xans-layout-statelogoff > a')))
        mainloginbtn.click()
         
        id = wait.until(EC.element_to_be_clickable((By.CSS_SELECTOR, '#member_id')))       
        id.click()
        id.send_keys('toast')
         
        pw = driver.find_element(By.CSS_SELECTOR, '#member_passwd')
        pw.click()
        pw.send_keys('1234')
         
        loginbtn = driver.find_element(By.CSS_SELECTOR, '#member_login_module_id > div > fieldset > div > div.ec-base-button.gFull > button')
        loginbtn.click()
         
        sleep(8)
 
    def tearDown(self):
        self.driver.quit()
  
if __name__ == '__main__':
    suite = unittest.TestLoader().loadTestsFromTestCase(LoginTest)
    unittest.TextTestRunner(verbosity=2).run(suite)

'APP Test > Appium' 카테고리의 다른 글

Linux 자동화 환경 구성  (0) 2022.06.07
Appium Automation Framework from Java, Maven, TestNG  (0) 2020.08.10
블로그 이미지

정신차려이각박한세상속에서

,

환경정보

  • Ubuntu


작업 절차

1. NVM(Node Version Manager 설치)

  • 아래 명령어를 통한 설치 스크립트 실행
$ wget -qO- https://raw.githubusercontent.com/nvm-sh/nvm/v0.39.1/install.sh | bash

$ source /home/toast/.bashrc
  • 설치 가능한 버전 확인
$ nvm ls-remote
  • 아래의 명령어로 최신 버전 설치
$ nvm install v16.15.0
  • NPM 버전 확인
$ npm -v


2. Appium 설치

  • 아래의 명령어로 앱피움 설치
$ npm install -g appium
  • 앱피움 닥터 설치 후 실행으로 앱피움 실행 패키지 검사 확인
$ npm install -g appium-doctor
  • java 관련 jre 설치 및 확인
$ sudo apt install default-jre
 
$ java --version


3. Android Command Line Tools 설치 및 환경 변수 설정

$ mkdir -p Android/Sdk
toast@toast:~/Android/Sdk$ unzip commandlinetools-linux-8092744_latest.zip
  • 압출 파일을 아래 폴더에 이동
$ cd cmdline-tools/
$ mkdir latest
$ mv bin/ latest/
$ mv lib/ latest/
$ mv NOTICE.txt  latest/
$ mv source.properties  latest/
  • sdk manager 리스트 확인
$ cd /home/toast/Android/Sdk/cmdline-tools/latest/bin/
$ sdkmanager --list
  • 필요한 패키지 설치
$ sdkmanager "platform-tools" "emulator" "build-tools;30.0.3"
  • home 디렉토리에서 환경 변수 설정
$ cd ~
$ vi .bashrc
하단에 아래 내용 추가
export ANDROID_HOME="$HOME/Android/Sdk"
export JAVA_HOME="/usr/lib/jvm/default-java"
 
export ADB="$ANDROID_HOME/plaform-tools/adb"
 
$ source .bashrc


4. Python Appium Client 설치

  • 파이썬 스크립트에 포함된 모듈 설치
$ sudo apt install python-pip
$ pip install Appium-Python-Client==0.52


5. Appium 실행

  • 아래의 명령어()로 앱피움 서버 실행
$ appium -p 4725

예뮬레이터 환경구성

1. 환경변수 확인 및 사전작업

  • 환경변수 확인
$ cd ~
$ vi .bashrc
 
export ANDROID_HOME="$HOME/Android/Sdk"
export ANDROID_SDK_ROOT="$HOME/Android/Sdk"
export ANDROID_SDK_HOME="$HOME/Android/Sdk"
export ANDROID_AVD_HOME="$HOME/.android/avd"
 
export JAVA_HOME="/usr/lib/jvm/default-java"
 
export ADB="$ANDROID_HOME/platform-tools/adb"
 
export PATH=$PATH:$ANDROID_HOME/tools
export PATH=$PATH:$JAVA_HOME/bin
export PATH=$PATH:$JAVA_HOME/emulator
 
$ source .bashrc
  • 필요 패키지 다운로드(안드로이드 버전은 맞춰서 다운)
$ cd /home/toast/Android/Sdk/cmdline-tools/latest/bin/
$ ./sdkmanager "system-images;android-25;google_apis;armeabi-v7a" "platforms;android-25"
  • 라이센스 동의
$ ./sdkmanager --licenses


2. 예뮬레이터 생성 및 실행

  • 예뮬레이터 생성(다운받은 패키지 버전을 실행시키면 된다)
$ cd /home/toast/Android/Sdk/cmdline-tools/latest/bin/
$ echo "no" | ./avdmanager create avd -n test -k "system-images;android-25;google_apis;armeabi-v7a"
  • 생성된 예뮬레이터 리스트 확인
$ cd /home/toast/Android/Sdk/emulator
$ emulator -list-avds
test
  • 예뮬레이터 실행(case1. GPU모드)
$ cd /home/toast/Android/Sdk/emulator
$ ./emulator -avd test -no-audio -no-boot-anim -accel on -gpu swiftshader_indirect
  • 예뮬레이터 실행(case2. 헤드레스모드)
    • emulator -avd {EMULATOR_NAME} -no-window
$ cd /home/toast/Android/Sdk/emulator
$ emulator -avd test -no-window


'APP Test > Appium' 카테고리의 다른 글

Hybrid App 스크립트 작성  (0) 2022.06.07
Appium Automation Framework from Java, Maven, TestNG  (0) 2020.08.10
블로그 이미지

정신차려이각박한세상속에서

,

개요

  • gitlab에서 소스 변동이 발생될 시 jenkins에 자동으로 빌드 되도록 설정 방법을 기술


1. Webhook 이란?

  • 서버에서 어떠한 작업이 수행되었을때 해당 작업이 수행되었음을 HTTP POST로 알리는 개념을 말한다
  • gitlab에서 webhook 설정이 되어있다면 git push 시 HTTP 신호를 전달받아 젠킨스에서 연동된 gitlab repo의 item에 build now를 실행


2. [Jenkins] Build Trigger설정

  • 빌드 유발 > Build when a change is pushed to GitLab 체크 & URL 확인 및 저장
  • 하단에 고급 클릭
  • Secret token항목에 "Generate" 버튼을 누르고 표시되는 토큰 값도 별도로 복사하고 저장 


3. [Gitlab] Webhook설정 및 테스트

  • gitlab의 연동할 프로젝트로 이동한다음 웹훅 설정 페이지 진입
    • Settings > Webhook 
  • 2번 "[Jenkins] Build Trigger설정"에서 복사해뒀던 url 과 token 값을 입력, 하단을 보면 여러가지 트리거가 유발되는 설정을 할 수 있으며 이 부분은 사용자마다 본인의 상황에 고려하여 설정하는게 좋을 것 같다. 
  • 하단에 "Add webhook" 버튼을 누른후 새로 생성된 Project Hooks에 대해 테스트를 해본다. 
  • 테스트 결과
  • 빌드를 유발시켰기때문에 젠킨스에서 빌드한 내역이 확인 가능하다
    •  
  •  

'UI Test > Jenkins' 카테고리의 다른 글

TestLink & RobotFramework Plugin 관련 설정  (0) 2020.08.20
블로그 이미지

정신차려이각박한세상속에서

,

개요

해당 글은 Cypress를 이용한 스크린샷 테스트를 간략하게 실행해본 글입니다.

어느 정도 cypress에 대해 사용해본 입장에서 기록한 글입니다.


환경셋팅

git clone git clone https://github.com/leonardofaria/cypress-example.git


npm install

package.json에 있는 라이브러리 설치


npm run serve

테스트 서버 구동

D:\cypress-example>npm run serve

> cypress-example@1.0.0 serve
> serve public -p 8000       

UPDATE AVAILABLE The latest version of `serve` is 13.0.2

   ┌──────────────────────────────────────────────────┐
   │                                                  │
   │   Serving!                                       │
   │                                                  │
   │   - Local:            http://localhost:8000      │
   │   - On Your Network:  http://10.214.134.2:8000   │
   │                                                  │
   │   Copied local address to clipboard!             │
   │                                                  │
   └──────────────────────────────────────────────────┘


http://localhost:8000 접속하여 테스트 페이지 확인

테스트 페이지 확인


테스트 스크립트 파일 확인

cypress\integration\screenshot.spec.js

"cypress-wrapper" 요소를 찾은 다음 이미지가 이전 스크린샷과 일치하는지 확인

const routes = ['badge.html', 'button.html'];

describe('Component screenshot', () => {
  routes.forEach((route) => {
    const componentName = route.replace('.html', '');
    const testName = `${componentName} should match previous screenshot`;

    it(testName, () => {
      cy.visit(route);
  
      cy.get('.cypress-wrapper').each((element, index) => {
        const name = `${componentName}-${index}`;
  
        cy.wrap(element).matchImageSnapshot(name);
      });
    });
  });
});

테스트 진행

npm test run

명령어를 통한 헤드리스 테스트 실행

D:\cypress-example>npm test run                                

> cypress-example@1.0.0 test
> cypress "run"


====================================================================================================

  (Run Starting)

  ┌────────────────────────────────────────────────────────────────────────────────────────────────┐
  │ Cypress:    4.11.0                                                                             │
  │ Browser:    Electron 80 (headless)                                                             │
  │ Specs:      1 found (screenshot.spec.js)                                                       │
  └────────────────────────────────────────────────────────────────────────────────────────────────┘


────────────────────────────────────────────────────────────────────────────────────────────────────

  Running:  screenshot.spec.js                                                              (1 of 1)
Browserslist: caniuse-lite is outdated. Please run:
npx browserslist@latest --update-db


  Component screenshot
    √ badge should match previous screenshot (2732ms)
    √ button should match previous screenshot (1360ms)


  2 passing (4s)


  (Results)

  ┌────────────────────────────────────────────────────────────────────────────────────────────────┐
  │ Tests:        2                                                                                │
  │ Passing:      2                                                                                │
  │ Failing:      0                                                                                │
  │ Pending:      0                                                                                │
  │ Skipped:      0                                                                                │
  │ Screenshots:  5                                                                                │
  │ Video:        false                                                                            │
  │ Duration:     4 seconds                                                                        │
  │ Spec Ran:     screenshot.spec.js                                                               │
  └────────────────────────────────────────────────────────────────────────────────────────────────┘


  (Screenshots)

  -  D:\cypress-example\cypress\snapshots\screenshot.spec.js\badge-0.snap.png               (720x28)
  -  D:\cypress-example\cypress\snapshots\screenshot.spec.js\badge-1.snap.png               (720x28)
  -  D:\cypress-example\cypress\snapshots\screenshot.spec.js\button-0.snap.png              (720x44)
  -  D:\cypress-example\cypress\snapshots\screenshot.spec.js\button-1.snap.png              (720x44)
  -  D:\cypress-example\cypress\snapshots\screenshot.spec.js\button-2.snap.png              (720x46)


====================================================================================================

  (Run Finished)


       Spec                                              Tests  Passing  Failing  Pending  Skipped  
  ┌────────────────────────────────────────────────────────────────────────────────────────────────┐
  │ √  screenshot.spec.js                       00:04        2        2        -        -        - │
  └────────────────────────────────────────────────────────────────────────────────────────────────┘
    √  All specs passed!                        00:04        2        2        -        -        -  


D:\cypress-example>


npm test open 명령어로 테스트 실행을 볼 수 있음

npm test open 명령어 실행 화면


상단 메뉴 > settings > Configuration

모든 Cypress 설정을 확인할 수 있음

작업을 실행하는 브라우저를 변경 가능

상단 메뉴 > settings > Configuration


상단 메뉴 > Tests

실행할 스크립트를 클릭하여 테스트 실행

헤드리스 모드에서 헤드리스 없음 모드로 실행을 전환할 때 발생하는 오류 (이미지 크기 관련)

아래 명령어(환경변수를 전달하여 모든 스냅샷을 업데이트)

를 통해 가볍게 넘겨준다

npm test open -- --env updateSnapshots=true

명령어 실행 후 정상적인 화면


테스트 서버 페이지 버튼 이름 변경 후 테스트 실행

npm test open


테스트하는 요소가 이전 스크린샷과 일치하지 않아 테스트 결과 실패


아래 파일에서 어떤 것이 다른지 확인 가능함


블로그 이미지

정신차려이각박한세상속에서

,

해당 문서에는 Jenkins와 RobotFrameowrk & TestLink를 연동하는 내용을 설명합니다.

설치에 대한 내용은 생략합니다.


[TestLink 관련 설정]

TestLink 서버 접속하여 아래와 같이 "config.inc.pnp" 파일 설정 변경

$ tlCfg-> api-> enabled = TRUE;
$ tlCfg-> exec_cfg-> enabled_test_automation = ENABLED;


테스트 프로젝트 설정 확인

메인화면 > 테스트 프로젝트 관리 > 해당 프로젝트 클릭


테스트 계획 설정 사전 확인

"사용함" 및 "Pubilc"인 상태가 되어야 함(당연한 얘기지만)

메인화면 > 테스트 계획 관리

테스트 플랜 이름은 영어로!

테스트 플랜 이름이 한글이면 뿔난 젠킨스씨를 만나게 될 것이야!


사용자 정의 필드 생성

RobotFramework와 매칭 될 사용자 정의 필드를 생성한다

메인화면(해당 테스트프로젝트) > 사용자 필드 정의 > 생성


사용자 필드 지정

앞서 생성한 사용자 정의 필드가 RobotFramework의 매칭 될 부분을 지정한다

필자는 RobotFramework의 테스트 케이스와 테스트 링크 테스트 케이스와 1:1 매칭 하기 위해 아래와 같이 설정하였다.

메인화면(해당 테스트프로젝트) > 사용자 필드 지정 > 생성한 사용자 필드 체크 > 지정 클릭


플랫폼 확인 및 지정

메인화면(해당 테스트프로젝트) > Platform Management


테스트 케이스 설정 확인

테스트 케이스의 설정을 아래와 같이 설정해준다

실행 형태 : Automated

아래 사용자 정의 필드 생성한 항목이 있다. 해당 항목은 RobotFramework 스크립트의 해당 테스트 케이스 이름으로 입력!


테스트 케이스 추가 확인

아래와 같이 해당 플랫폼에 해당 테스트케이스가 해당 사용자로 추가가 되어야 한다.

요구 항목 : 테스트 계획, 테스트 플랜, 테스트 플랫폼, 테스트 케이스, 테스터 


[Jenkins관련 설정]

1. Jenkins와 관련된 TestLink Server 개인 API 정보 설정

Jenkins 관리 > 시스템 설정 > TestLink


Name : Toast(해당 API 키를 구분할 수 있으면 됨)

URL : http://"TestLinkServerIP"/lib/api/xmlrpc/v1/xmlrpc.php

[테스트 링크 서버 IP]/xmlrpc.php파일위치/xmlrpc.php

파일 위치는 테스트 링크 버전마다 다를 수 있으므로 해당 서버에 접속해서 위치 확인 후 입력

Developer Key : 아래 그림파일 참고하여 개인 API 접근 키 복붙

사용자를 여러 명 입력하고 싶으면 아래 추가 버튼을 눌러 해당 개인 API 접근키로 등록!

테스트링크 > 사용자정보 > API 인터페이스 > 개인 API 접근 키

추후 테스트 링크에 자동 입력될 사용자


2. Jenkins JOB 별 RobotFramework Plugin 관련 설정

"오래된 빌드 삭제 > 보관할 최대 개수 1" : 테스트 결과는 테스트 링크와 연동되어 자동으로 기록되어있기 때문에 1개로 함

"Restrict where this project can be run" : 해당 Job이 수행될 Agent 설정(기존에 등록한 Jenkins Agent 등록)

"사용자 빌드 경로 사용" : 빌드가 최초 실행될 디렉터리 지정


RobotFramework 스크립트 파일을 실행시키는 윈도우 배치 파일 커맨드를 아래와 같이 작성

[간략 설명]

해당 해당 스크립트를 실행하고 해당 테스트가 Pass 가되면 결과 파일(junit.xml)을 남기고

해당 테스트가 Fail 시 한번 더 실행해서 최초 실행 결과 파일과 머지하여 최종 결과 파일(junit.xml)을 남긴다

cd C:\AutoTest\Server\Target
::Executable
:: clean previous output files
@echo off
rd /s /q Results_Target
echo #######################################
echo # Running tests first time 	   #
echo #######################################
robot -x original_junit.xml --output original.xml -d Results_Target 1_1_1_2_Target.robot
:: we stop the script here if all the tests were OK
if errorlevel 1 goto DGTFO
echo #######################################
echo # Tests passed, no rerun 		   #
echo #######################################
:: we keep a copy of the first output file (added)
copy Results_Target\original.xml Results_Target\output.xml /Y
copy Results_Target\original_junit.xml Results_Target\junit.xml /Y
exit /b
:: otherwise we go for another round with the failing tests
:DGTFO
:: we keep a copy of the first log file
copy Results_Target\log.html Results_Target\first_run_log.html /Y

:: we launch the tests that failed
echo #######################################
echo # Running again the tests that failed #
echo #######################################
cd Results_Target
del /q original_junit.xml
robot -R original.xml --output rerun.xml "\AutoTest\Server\Target\1_1_1_2_Target.robot"
:: Robot Framework generates file rerun.xml

:: we keep a copy of the second log file
copy log.html second_run_log.html /Y

:: Merging output files
echo ########################
echo # Merging output files #
echo ########################
rebot --NoStatusRC -x junit.xml --output output.xml -R original.xml rerun.xml
:: Robot Framework generates a new output.xml


3. Jenkins JOB 별 TestLink Plugin 관련 설정

프로젝트 > 구성 > Build > Add build step > Invoke TestLink

TestLink Version : Jenkins와 관련된 TestLink Server 정보 설정에서 설정한 버전 선택

Test Project Name : 연동할 TestLink의 테스트 프로젝트 이름

Test Plan Name : 연동 할 TestLink의 테스트 계획 이름

Build Name : 연동 할 TestLink의 빌드 이름

Custom Fields : 연동 할 TestLink의 사용자 필드 이름

Platform Name : 연동 할 TestLink의 플랫폼 이름(고급 버튼 클릭 시 활성화)


프로젝트 > 구성 > Build > Add build step > Result Seeking Strategy

Include Pattern : junit파일 이름

사용자 빌드 경로가 적용되므로 경로를 입력하지 않는다.

Key Custom Field : TestLink 사용자 정의 필드 이름


아래는 해당 빌드 후 조치에 대한 설정이다.

"Dritectory of Robot output" : C:\AutoTest\Server\Target\Results_Target

위의 배치 스크립트에서 지정한 테스트 결과 폴더


만약 파이프라인으로 JOB을 등록 시

빌드 실패 시 라인으로 빌드결과 알림(샘플)

node {
    try{
        stage("Test_PASS"){
            build job: 'Testlink_test'
        }
        stage("Test_Fail"){
            build job: 'Testlink_fail'
        }
        
    currentBuild.result = 'SUCCESS'
    }catch (err) {
        currentBuild.result = 'FAILURE'
    }
  
    stage 'Notify'
        notifyLINE('bigFEmC2IIlEOssfsfyjgX4Wuh7TDbmos6zU6CYOM7L', currentBuild.result)
}
  
def notifyLINE(token, result) {
    def isFailure = result == 'FAILURE'
      
    def url = 'https://notify-api.line.me/api/notify'
    def message = "Result is ${result}. \n${env.BUILD_URL}"
      
    sh "curl ${url} -H 'Authorization: Bearer ${token}' -F 'message=${message}' "
}

자세한 내용은 아래 URL 참고

https://plugins.jenkins.io/testlink/


TestLink

This plugin integrates Jenkins and TestLink.

plugins.jenkins.io

https://wiki.jenkins.io/display/JENKINS/Robot+Framework+Plugin


Robot Framework

This publisher stores Robot Framework test reports for builds and shows summaries of them in project and build views along with trend graph.

plugins.jenkins.io


'UI Test > Jenkins' 카테고리의 다른 글

Gitlab Webhook으로 Jenkins 빌드 자동화  (0) 2022.03.10
블로그 이미지

정신차려이각박한세상속에서

,

E2E 테스를 위해서는 실제 모바일 테스트 디바이스가 필요하다

아래의 설정으로 Android Stuido 에뮬레이터에서 실행하는 방법을 진행하였다.


[사전설정]

Java installed on system

JAVA_HOME is set in environment variables

command to check : java -version

200 MB to 1 GB of free space


Install android studio

아래의 페이지에서 설치 ㄱㄱ

https://developer.android.com/studio?hl=es


Download Android Studio and SDK tools  |  Android Studio

developer.android.com


Set environment variables

설치 후 아래 환경 변수 path 설정 필수

SDK위치/platform-tools


에뮬레이터 실행 관련

상단에 "AVD Manager" 클릭


하단에 "Create Virtual Device" 클릭

자세한 설명은 아래 URL 참고

https://mainia.tistory.com/5301


안드로이드 스튜디오 에뮬레이터 생성과 실행시키는 방법

안드로이드 스튜디오 에뮬레이터 생성과 실행시키는 방법 환경: Android Studio 안드로이드 스튜디오에서 개발한 소스를 테스트해 보기 위해서는 에뮬레이터가 있어야 합니다. 에뮬레이터는 지금��

mainia.tistory.com


상단에 표시 클릭하면 안드로이드 에뮬레이터가 실행된다


Run command adb devices

adb = android debug bridge

Check your device id displayed


'APP Test > 테스트 환경구성' 카테고리의 다른 글

Appium 구축  (0) 2020.08.13
JENKINS 설정 및 테스트  (0) 2020.08.13
빌드 환경 구성(Jenkins-Android-Docker)  (0) 2020.08.10
블로그 이미지

정신차려이각박한세상속에서

,

[사전확인]

Native App, Web App, Hybrid App

출처 : https://m.blog.naver.com/acornedu/221012420292


What is Appium ?

Appium은 모바일 애플리케이션의 테스트 자동화를 가능하게 해주는 오픈소스 라이브러리이다. native, hybrid, mobile web 등 모든 타입의 모바일 애플리케이션의 테스트 자동화를 가능하게 해준다. 자동화된 테스트는 실제 디바이스나 에뮬레이터, 혹은 시뮬레이터에서 실행될 수 있다. 


How Appium Works

앱피움은 Client - Server 아키텍쳐로 동작한다

Appium 서버는 Node.js로 작성되었으며 WebDriver 세션을 생성하고 관리하는 HTTP 서버이다.

클라이언트는 아래의 언어를 지원한다

Java
Python
C#
Javascript
Ruby
PHP
Robot Framework


[Desired Capabilities]

자동화 세션의 종류를 서버에 알리기 위해 Appium 서버로 전송되는 일련의 키와 값입니다.

관련 설명은 아래 URL 참고

http://appium.io/docs/en/writing-running-appium/caps/


Desired Capabilities - Appium

From here you can search these documents. Enter your search terms below.

appium.io


[How to install appium on Windows]

Check if node.js is installed on your system

node --version
npm --version


Download node.js installer 

https://nodejs.org/en/download/


Download | Node.js

Node.js® is a JavaScript runtime built on Chrome's V8 JavaScript engine.

nodejs.org

Run the installer & install node.js & npm


Check if node.js & npm are installed

node --version npm --version

where node

where npm


Install appium with node.js

npm install -g appium


Check if appium is installed

appium -v
where appium


Start appium

appium


[How to install appium with with Appium Desktop Client]

Download appium desktop client

http://appium.io/


Appium: Mobile App Automation Made Awesome.

Appium Philosophy Appium is built on the idea that testing native apps shouldn't require including an SDK or recompiling your app. And that you should be able to use your preferred test practices, frameworks, and tools. Appium is an open source project and

appium.io

 Install appium desktop client

 Start appium through appium desktop client


How to check installation & dependencies (appium-doctor)

Install appium-doctor

https://github.com/appium/appium-doctor


appium/appium-doctor

Tool to verify appium installation. Contribute to appium/appium-doctor development by creating an account on GitHub.

github.com

npm install appium-doctor -g
appium-doctor -h
appium-doctor --android


[앱피움 관련 설명 참고 URL]

https://domich.wordpress.com/2016/01/11/appium-%EC%95%A0%ED%94%BC%EC%9B%80-%ED%94%84%EB%A1%9C%ED%8C%8C%EC%9D%BC%EB%A7%81-%EA%B8%B0%EB%B0%98-ui-%ED%85%8C%EC%8A%A4%ED%8A%B8-%EC%9E%90%EB%8F%99%ED%99%94-%EB%8F%84%EA%B5%AC/


안드로이드 테스팅의 효자손 “Appium(앱피움)” 파헤치기 1

[마이크로 소프트웨어 기고, 2015년 7월 31일] 안드로이드 테스팅의 효자손 “Appium(앱피움)” 파헤치기 1 -앱피움 개요 -앱피움의 아키텍쳐 -개발환경 구성 ->안드로이드 앱 개발 환경 구성하기 ->��

domich.wordpress.com


'APP Test > 테스트 환경구성' 카테고리의 다른 글

Android Stuido Emulator  (0) 2020.08.13
JENKINS 설정 및 테스트  (0) 2020.08.13
빌드 환경 구성(Jenkins-Android-Docker)  (0) 2020.08.10
블로그 이미지

정신차려이각박한세상속에서

,

프로젝트 관련

APP Test 2020. 8. 13. 14:09

해당 페이지는 프로젝트에 관련해서 설명하는 페이지입니다.

자세한 설명은 해당 링크를 참고하시면 됩니다.


도커 컨테이너로 구성된 빌드서에서 빌드를 진행

빌드환경은 따로 구축하지 않고 도커 허브에 있는 이미지로 구성함


Maven, TestNG, AppiumClient를 통한 테스트 스크립트 작성

Appium은 Selenium 베이스라 어떤 언어로도 사용 가능하지만, Java 클라이언트가 가장 사용량이 많고, 그만큼 서포트가 빠르며 안정된 클라이언트이기 때문에 Java를 선택하였다


젠킨스를 통해 빌드 및 테스트 스크립트 실행

E2E(End-to-End) 테스트이기 때문에 실제로 테스트 할 모바일 테스트기기가 필요했다

필자는 안드로이드 스튜디오의 에뮬레이터를 이용하여 프로젝트를 진행하였다.

블로그 이미지

정신차려이각박한세상속에서

,